In this post I’ll talk a bit about the architecture of my first nodejs application, Battlefield 3 Web Commander.
In addition to your usual web app stuff, Web Commander talks to Battlefield 3 game servers in real time and has many features related to that. It also displays data from the servers in real time. Because of these, there is a fair bit of complexity to it.
Main components used
As said, the application itself runs on nodejs. The data is stored in MongoDB.
In case of the node process crashing, forever is used to automatically restart it.
In front of the nodejs server is a Varnish HTTP accelerator. This was mainly used due to the fact I wanted to run the node app on port 80, where I was also running Apache.
The setup with Varnish is pretty simple: Varnish runs on port 80, and looks at the Host header of each HTTP request. It then routes to Apache, the node production instance or the node testing instance depending on the domain name used. The actual servers sit on other ports, but the user can’t tell the difference.
Overview of the application
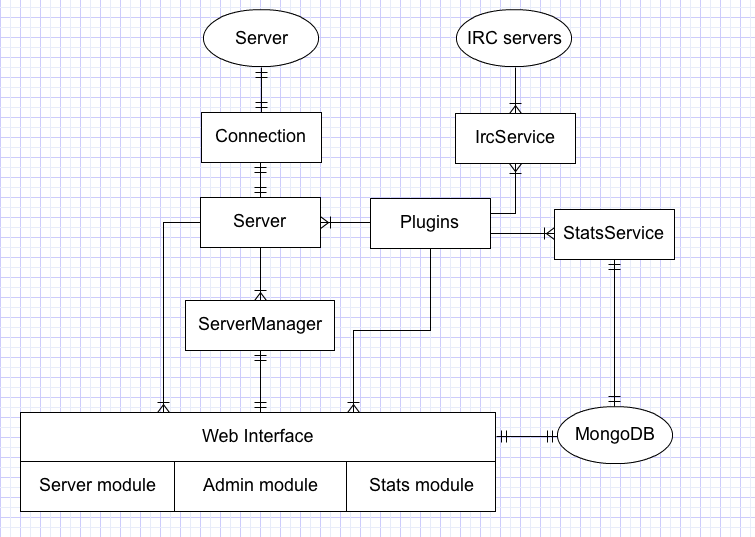
The application is structured between the web interface and the part which talks to the Battlefield 3 servers. Database access is relatively limited: Only the web interface and the StatService (more on that soon) talk to it.
Let’s talk about the more interesting part first.
Talking to the Battlefield 3 server
The objects which handle actions with the gameserver are the Connection and Server objects. Connection implements the low-level protocol used to talk to the Battlefield 3 server. It’s a binary-protocol, so it’s implemented using the binary writing/reading methods in Buffer. It implements methods for sending commands to the server and listening to the low-level events from the server.
The Server object on the other hand implements a higher level interface on top of the Connection – methods such as kicking and banning players or editing the maplist are callable via a Server instance. In addition, it also handles all the other server-related stuff involved: It keeps track of the maplist, current map, the list of players on the server and other things – essentially it represents the state of the gameserver in the code. Whenever the state changes in a meaningful way (for example if a player leaves or such), it emits events about it.
Both the Connection and Server are primarily custom code written on top of node builtins, mainly utilizing Buffer and EventEmitter.
To keep track of the state, the Server keeps several lists it updates whenever things happen on the server. In some cases, it also has to query the gameserver from time to time (using setInterval) in order to check if the data has changed, as certain things will not emit any events (such as changing server settings like friendly fire). Other things, like the player list, use both a periodic check and events to stay synced: Whenever players join or leave, the list must be updated, but many player events don’t include data like the player’s total score in them, which in turn needs to be polled from the gameserver.
The job of the ServerManager is to keep track of the servers. It does tasks like connecting and disconnecting servers, testing connections to newly added servers, and it also tries to automatically reconnect any servers which get their connection to the gameserver dropped which happens pretty often and would otherwise require the user to manually reconnect.
For reconnecting, it uses a pretty simple approach of “Wait X seconds and try again.”. If it can’t get reconnected, it waits some more and tries again until it works (or reaches the current limit of 100 retries – The servers are sometimes pretty stubborn).
Plugin architecture
To make it easy to provide further features outside the basics of what is implemented by the game protocol itself, the Server object supports plugins. These are basically features the users can enable or disable on a per-server basis, such as automatic team balancing or map voting. Plugins themselves work simply by registering with the server, and listening events from them and sending commands back using the interface provided by the Server object.
Plugins are always server specific. A new instance of a plugin is always created for each server it’s running on. Sometimes plugins need shared functionality, so for that there are the two services shown in the diagram. These are exposed to the plugins via the constructor and the plugin can grab any service instances it needs from there.
In theory, 3rd parties could create new plugins which can then be used, but as the code is not open-source there is currently no way for anyone else besides myself to create plugins.
Plugins only utilize the interfaces provided by services and server.
Services
As one might guess, the purpose of the StatService is to persist server statistics to the database. There is a plugin which when installed on a server, calls methods on the StatService to record all kinds of statistics, such as kills, deaths, score, etc. for all players. The StatService is currently the only component in addition to the web interface which talks to MongoDB.
The IrcService is the more interesting of the current two services. There’s a plugin available which can send reports from your server to an IRC channel of your choice. Now, we could create a new IRC bot for each server, but IRC servers limit the amount of connections you can do from a single IP address. Thus, we need to share a single IRC bot for this.
The IRC service keeps track of the IRC bot. If a plugin requests a bot on a channel, the service will check if the bot is on the channel, and if necessary, it will connect to the IRC server and join the channel. It also keeps track of the bot so, that if multiple servers require the bot on the same channel, the bot will only leave the channel after it has been disabled for all the servers which requested it.
The IRC service uses node-irc to talk to the IRC server, but I will probably have to replace it with something else since it sometimes makes the entire application unstable if there’s a connection error. The StatService uses Mongoose for the MongoDB parts.
The web frontend
The web parts of Battlefield 3 Web Commander are built on top of Express and use ejs for templating.
It’s split into three main modules: The server, admin and stats modules.
You can probably guess the primary purposes of each module based on their names.
Server module
The server module contains the logic involved in displaying the server list and all server-specific pages – overview, scoreboard, bans, maps and settings.
Many of the server pages update in real time. Socket.IO made a perfect tool for this. Essentially, for each server, there’s a bunch of event listeners in the server module which listen to some events from the Server object, and then emit some more events using Socket.IO. Users who are connected will then receive those events via Socket.IO, which in turn updates the KnockoutJS powered View Models on the client-side.
As mentioned, KnockoutJS is also used on many of the server module’s pages. I found it perfect for easily creating templates on the client which could be rendered based on data, without having to mess around with adding or removing elements in the DOM. Simply update the Knockout view model and the library handles keeping the DOM in sync.
The server related pages mainly just grab data from the Server instance and displays it to the user. Hidden to most people visiting are the admin tools present on the pages: On all server pages, an admin can perform actions on the things displayed. Admins can kick, ban, kill and chat from the Overview, kick/ban/kill from Scoreboard, add/remove bans from Bans, edit the server list using a snappy drag/drop based interface from the Maps page and change server settings or use presets such as Hardcore or Infantry Only on their server from the Settings page.
Some of the admin functionality use normal forms – for example, adding a new map simply submits a form – but others use Socket.IO to send commands to make the interface nicer to use. Reordering maps or removing maps is a good example of this. Since you may often move maps around or delete multiple maps, the tools for that use Socket.IO to make it faster to work with.
The admin tools in the server module only perform actions which directly affect a specific server instance.
Stats module
The stats module is perhaps the simplest of all of the web modules: It simply queries the database and displays what was queried. There is no real-time updates on any of the pages (except if you hit reload), and there are no admin tools or such.
Admin module
The admin module contains the rest of the admin functionality available: It allows you to add and edit servers and users, and to view entries in the admin audit log and any reports sent by players.
The audit log is simply a list of actions taken by admins. Whenever an admin does something, their action is logged along with any relevant details. This makes it easy to see who did and what later if necessary.
The reporting functionality is provided as an option for each server. A player can send a report by using a command in chat, and Web Commander will save the current state of the server along with the most recent lines of chat into the DB so that admins can take a look at it later. This is so that if there’s a problem on the server and no admins, it can be later solved based on the report. The IRC bot plugin can also send messages to IRC whenever there’s a new report.
The server editing in the admin module is the only part of it which uses Socket.IO. When creating a new server, it was easier to display the progress of it in a meaningful and easy to understand way if the page wasn’t fully reloaded. The connection can fail in a variety of ways and it can take several seconds for it to be established (or fail), so it makes sense to display a dynamic progress indication instead of a full page load.
Another part of the server editing which uses Socket.IO is connecting and disconnecting servers. This was done due to the same reasons as when creating new servers.
The server editing parts of the admin module are related to configuring how Web Commander handles the server, such as the plugins you want and their settings, and not gameserver-specific things like max player number or friendly fire settings, which are configured from the server module’s Settings page.
The users part of it is quite self-explanatory: You can edit users and choose what access rights they have on each of the servers. Web Commander implements a simple access check solution which supports having a “super admin” with access to all servers under an account, “server admins” who have full access to a specific server, and finally a more gradual access where you can choose what specific tools a user can use (eg. if they can kick a player or edit the map list).
Otherwise it’s mostly your standard admin panel type of functionality with some KnockoutJS sprinkled in for ease of use.
In closing
Although I hadn’t done much node stuff before this project besides some simple experiments, I think the choice of tools for this was pretty much perfect.
There have been no major issues working with node, problems mainly rising from the poor documentation of how the Battlefield 3 server protocol works.
The plan with this currently is to go forward into a SaaS model with paid subscriptions. This will bring some additional complexity to this in the form of having to handle payments and tracking if anyone has not paid, and disabling their servers/account if so.
We’ll see how that goes. Hopefully later this month.
What do you think? Is there anything else you’d like to hear about this? I can do another post with more details on any specific parts.